
How to paint window frames: a DIY guide
- WM Creative Designs Limited
- May 31
- 9 min read

TL;DR:
Proper preparation, including thorough cleaning, sanding, and priming, is essential for a durable, professional-looking window frame paint job.
Using the right materials for your frame type and applying thin, even coats ensures a crisp finish that lasts longer and resists peeling or flaking.
Peeling paint, brush marks on the glass, and a finish that looks worse after you’ve finished than before you started. If any of that sounds familiar, you’re not alone. Knowing how to paint window frames properly is one of those jobs that looks straightforward but catches plenty of homeowners out. The good news is that with the right preparation, the right materials, and a bit of patience, you can achieve a genuinely crisp, professional finish. This guide walks you through every stage, from gathering your tools to applying the final coat.
Key takeaways
Point | Details |
Prep is everything | Thorough cleaning, sanding, and priming determines how long your paint lasts. |
Match paint to the frame material | Wood, uPVC, and metal each require different primers and top coats. |
Use the right brush | An angled sash brush gives far more control than a roller on detailed window profiles. |
Mind your drying times | Latex paint needs 2 to 4 hours between coats; oil-based paint can need a full 24 hours. |
Remove tape at the right moment | Pull masking tape off at a 45-degree angle while the paint is still tacky for clean edges. |
Tools and materials for painting window frames
Getting your kit together before you start saves a lot of frustration mid-job. Here’s what you’ll need.
Tool or material | Purpose |
Angled sash brush (25mm or 50mm) | Precise application on narrow edges and mouldings |
Fine and medium sandpaper (120 and 180 grit) | Keying the surface and smoothing between coats |
Painter’s tape | Masking glass and adjacent surfaces |
Sugar soap or TSP substitute | Degreasing and cleaning frames before painting |
Wood filler or exterior filler | Repairing cracks, gaps, and minor rot damage |
Penetrating wood primer | Deep adhesion for bare or stripped timber |
Undercoat or bonding primer | Foundation coat for all frame types |
Top coat paint (satin or gloss) | Final finish coat for durability and appearance |
Dust sheets | Protecting sills and floors below |
The material your frames are made from changes what products you need. For timber frames, a penetrating primer followed by an oil-based or water-based top coat works well. For uPVC, you need a specialist adhesion primer because standard primers simply won’t bond. Metal frames require a rust-inhibiting primer before any top coat goes on.
For the best paint for window frames in most domestic situations, water-based acrylic latex is the go-to choice. It dries faster, cleans up with water, and holds up well to the knocks and moisture that windows take. A semi-gloss or gloss finish is worth choosing over matt because it wipes clean easily and the light reflection makes frames look sharper.
Pro Tip: Buy a quality angled sash brush rather than going for the cheapest option on the shelf. A good brush holds more paint, lays it more evenly, and makes cutting in along the glass far easier. It’s the single biggest upgrade you can make to your toolkit.
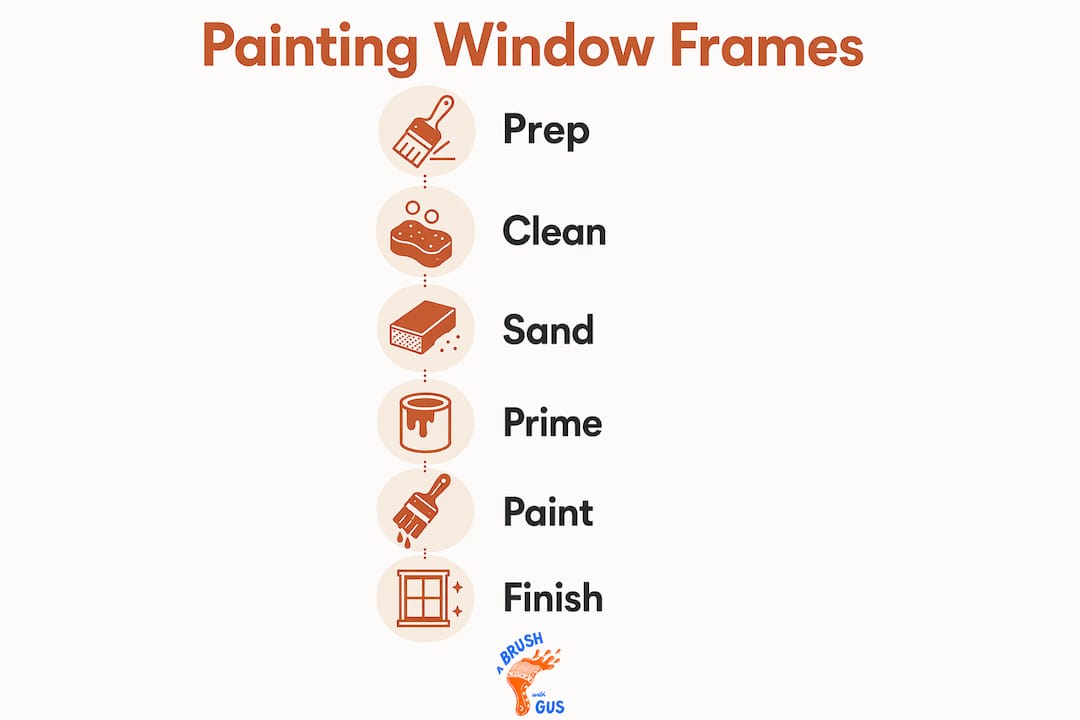
How to prep window frames for the best results
Preparation is where the real work happens. Skipping or rushing this stage is why most DIY paint jobs peel or look patchy within a year.
Cleaning the surface
Start by washing the frames down thoroughly with sugar soap or a TSP substitute, paying particular attention to any greasy patches or mildew. Rinse well and let the frames dry completely before moving on. On exterior frames, a pressure washer on a low setting speeds this up considerably.
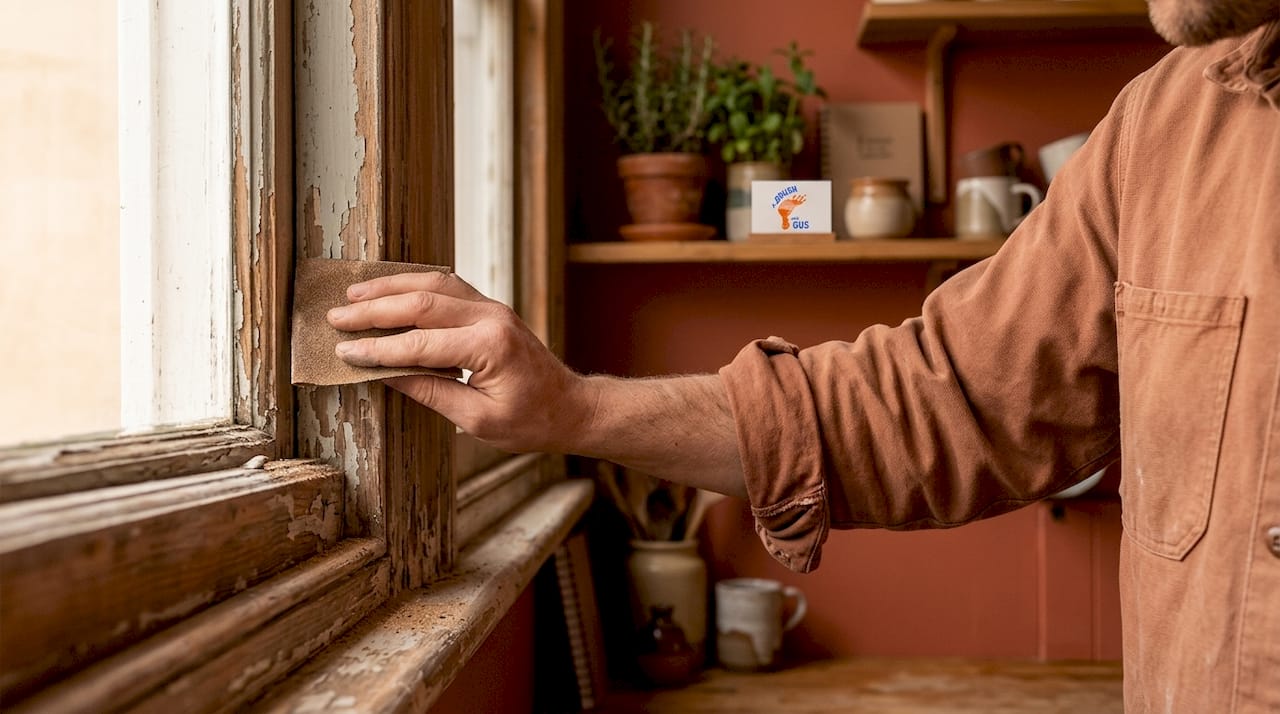
Dealing with old paint
If existing paint is in good condition and well bonded, you can work over it after a light sand. If it’s flaking, bubbling, or peeling in sections, strip it back. For heavy paint build-up on intricate mouldings, a heat gun works efficiently but needs careful handling near glass. Overheating the glass risks cracking it, so work slowly and use a shave hook to get into tight spots. Chemical strippers are an alternative, but they require thorough neutralising before any primer goes on.
For varnished exterior frames, sanding back to raw timber before priming is the correct approach. Painting directly over an old varnish coat significantly shortens the life of the new finish.
Sanding, filling, and priming
Once stripped or degreased, sand the surface with medium-grit paper to create a key for the primer, then finish with fine-grit for smoothness. Fill any cracks or gaps with an appropriate filler and sand flush once dry. For timber that has softened or shows minor rot, dig out the damaged material, treat with a hardener, and fill before continuing.
The steps to prep window frames are:
Wash frames with sugar soap and rinse thoroughly
Strip or scrape any loose or flaking paint
Sand the surface with medium grit, then fine grit
Fill cracks and holes; sand smooth once dry
Apply masking tape to glass and adjacent surfaces
Apply primer to all bare or stripped areas
On the priming timing: leaving bare timber exposed overnight before priming, especially in damp or cold conditions, allows moisture to penetrate the wood and causes adhesion failures down the line. Prime bare wood the same day you expose it.
Exterior frames need more attention than interior ones. Moisture, UV exposure, and temperature swings all stress the paint system harder outside, so thorough prep is not optional. Interior frames in dry rooms can tolerate a lighter touch, but the basics still apply.
Pro Tip: When applying painter’s tape to the glass, press the edge down firmly with a putty knife or your fingernail. A loose edge lets paint creep underneath, and you’ll end up with the same fine line of paint on the glass you were trying to avoid.
Steps to paint window frames like a professional
With prep complete, painting window frames becomes a satisfying, methodical process. Work through these steps and take your time.
Apply your primer coat. Use an angled sash brush and work the primer into any mouldings and recesses first, then brush out onto the flat faces. Don’t overload the brush. A thin, even coat bonds better than a thick one.
Allow full dry time before continuing. Check the tin for the manufacturer’s recommendation. For exterior primers on timber, this is usually 4 to 6 hours in good conditions.
Sand lightly between coats. Once the primer is fully dry, a light pass with fine-grit paper knocks back any raised grain or brush marks. Wipe away the dust with a damp cloth and let the surface dry completely before applying paint.
Apply your first top coat. Load the brush about one third of the way up the bristles and start with the edges and rebates before working across the flat surfaces. Work in small sections and keep a wet edge to avoid lap marks.
Let the first coat dry fully. Latex paint typically needs 2 to 4 hours between coats indoors. Oil-based paints can need up to 24 hours, and in humid or cold conditions both types take longer. Don’t rush this. A second coat applied over tacky paint will pull and look terrible.
Sand lightly again and apply the second top coat. The recommended exterior timber system uses one penetrating primer coat, one full primer coat, and two top coats with a sand between each. That’s the system that actually lasts.
Remove masking tape carefully. Once the final coat has gone on and the paint is tacky but not fully dry, pull the tape off at a 45-degree angle. This tears the paint film cleanly at the tape edge rather than peeling a chunk off with it.
For painting window trim on both interior and exterior frames, an angled sash brush genuinely outperforms rollers. The narrow tip gets into the rebate where the frame meets the sash, and the angled shape lets you cut in along the glass with far more confidence.
Pro Tip: If you do get paint on the glass, don’t try to wipe it off while it’s wet. You’ll smear it everywhere. Wait for it to dry completely, then scrape it off cleanly with a razor blade or a specialist glass scraper.
Troubleshooting problems and keeping frames looking good
Even a careful job can throw up issues. Here’s how to deal with the most common ones.
Peeling or flaking. Almost always caused by inadequate prep, moisture getting into bare wood before priming, or incompatible products. Strip back to sound paint, address any moisture source, prime promptly, and repaint properly.
Blistering. Bubbles under the paint surface indicate moisture or solvent trapped beneath the coat. This typically means the previous coat wasn’t fully dry before you applied the next one, or that moisture entered the timber before priming. Strip the affected area and redo from bare timber.
Uneven coverage or brush marks. Usually a sign of overloading the brush or applying paint that’s too thick. Thin your paint slightly if the brush is dragging, and work in longer, lighter strokes to lay the paint out evenly.
Paint on the glass. Scrape off cleanly with a razor blade once fully dry. If it’s widespread, painter’s tape on the next coat will sort it.
For long-term maintenance, trim back any vegetation growing near your window frames. Climbers and overhanging branches trap moisture against the paint and physically abrade the surface, wearing down even a good finish surprisingly quickly. Check frames once a year, touch up any chips or cracks promptly, and most exterior frames will hold their finish well. As a general rule, exterior timber frames benefit from a full repaint every five to seven years depending on exposure.
Don’t ignore minor rot or soft timber when you find it. A small area of rot that gets painted over will spread under the new coat. Dig it out, apply wood hardener, fill properly, and you’ll save yourself a much larger job later.
Pro Tip: Cleaning painted frames with a mild detergent and a soft cloth once or twice a year removes grime that gradually breaks down the paint film. It takes ten minutes and meaningfully extends the life of your finish.
My honest take on painting window frames
I’ve painted a lot of window frames over the years, and the single thing I keep coming back to is this: the preparation genuinely matters more than the paint. I’ve seen beautifully expensive top coats fail within a season because the prep was rushed, and I’ve seen modest budget paint hold for years on a properly prepared surface. Primer compatibility and thorough prep determines how long your work lasts, full stop.
The other thing I’d say to any DIYer is to be honest about what you’re working with. Frames that are heavily rotted, warped, or have been badly patched multiple times are not worth painting again. Fresh paint on a bad frame is money and time wasted. If you find yourself filling more than you’re painting, the frame deserves a proper assessment before you go any further.
That said, when the frame is in decent condition and you put the prep in properly, painting your own window frames is genuinely satisfying. The difference a freshly painted frame makes to the exterior of a house is remarkable, and the patience required to wait between coats is the hardest skill to develop but also the most valuable.
You can also find guidance on painting techniques for homeowners if you want to go deeper on brush control and coat application before you start.
— Angus
When professional help is worth considering

Some window frame projects are well within the reach of a capable DIYer. Others really benefit from professional input, particularly when you’re dealing with uPVC frames, large numbers of windows, or exterior work at height.
At Abrushwithgus, we specialise in uPVC window frame spraying that produces a factory-quality finish without replacement costs. We also offer professional exterior home painting services that include full prep, priming, and top coating to a standard that genuinely holds up to the South West’s weather. If your frames need a thorough clean before any painting work begins, our surface cleaning service takes care of that too. Whether you go DIY or want us to handle it, we’re always happy to have a conversation about what your project needs.
FAQ
What is the best paint for window frames?
Water-based acrylic latex in a semi-gloss or gloss finish is the best choice for most window frames. It dries quickly, cleans easily, and holds up well to moisture and handling.
Should I use a brush or roller for painting window trim?
Use an angled sash brush. Rollers can’t reach the rebates and moulded profiles on window frames, and they make it much harder to cut a clean line along the glass.
How many coats of paint do window frames need?
For exterior timber frames, the recommended system is one penetrating primer coat, one full primer coat, and two top coats with sanding between each. Interior frames typically need one primer coat and two top coats.
How often should exterior window frames be repainted?
Exterior timber frames generally need repainting every five to seven years, though exposure to harsh weather, direct sunlight, or persistent damp can shorten that cycle. Annual checks and prompt touch-ups extend the life of each paint job significantly.
Can I paint uPVC window frames myself?
Yes, but you must use a specialist adhesion primer formulated for uPVC before applying any top coat. Without it, the paint will not bond properly and will peel within months. For a factory-quality result, professional uPVC spraying is worth considering.
Recommended
Comments